Archive for February, 2010

Daring Bakers Challenge : Tiramisu
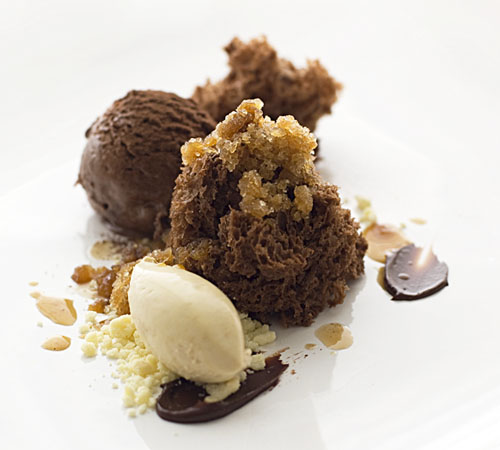
DaringBakers-Tiramisu3

(Tiramisu : Another way to ‘pick me up’)

The February 2010 Daring Bakers’ challenge was hosted by Aparna of My Diverse Kitchen and Deeba of Passionate About Baking. They chose Tiramisu as the challenge for the month. Their challenge recipe is based on recipes from The Washington Post, Cordon Bleu at Home and Baking Obsession.

Tiramisu is something I rather enjoy eating and have made many times before. Friends tell me of a local restaurant where if you order tiramisu, it is brought to your table in a large glass bowl and scooped right in front of you. Surely the perfect way to enjoy tiramisu!

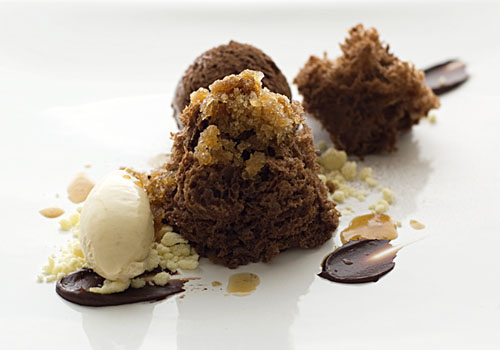
For the challenge this month, I thought I would try to present tiramisu in a different way whilst still retaining it’s rustic charm. Instead of assembling the components, I used them individually on the plate. My first attempt at this was not too successful. I think I was trying too hard to use all the necessary components on the plate, and sometimes you really can’t force something that just doesn’t fit.

At this point, I was humming a little ditty by Cher because I had run out of a few components and wasn’t sure if I’d have time to make them again. Luckily I managed to find a spare moment and decided to risk a second attempt – this time also boosting the chocolate content two or three-fold. What you see above is the end result.

The sponge is from here. It is light, very flavoursome, and lots of fun to make (what a great dinner party piece it would be, to get your guests to ‘make’ their own chocolate cake). Also on the plate : an espresso granita, Marsala-spiked chocolate pastry cream, a lucscious chocolate mousse and a coffee flavoured mascarpone. The mascarpone incidentally, was my favourite component. It’s not something I would usually bother making at home, though I’ve made it often at work (usually with double cream and citric acid, instead of single cream and lemon juice). Items that didn’t make it to the plate : the savoiardi sponge and zabaglione (but I promise you that I did make both the first time round).

You can get the recipes for the components from the hosts’ blogs. I’m providing the recipe for the chocolate mousse below.

Thank you Aparna and Deeba for the challenge! I loved the end result so much, I might be tweaking it a little and putting it on my menu soon 🙂
DaringBakers-Tiramisu4

Chocolate Mousse :
(serves 10; based on a recipe from Wild Weed Pie by Janni Kyritsis)

300g semi-sweet (57%-cocoa) couverture chocolate, melted and kept lukewarm
2 eggs
5 egg yolks
3/4 cup white sugar
1/4 cup water
1 1/2 cups 35%-fat cream, whipped to soft peaks

Whisk eggs and yolks in the bowl of an electric mixer until pale. Meanwhile, combine the 3/4 cup sugar and water in a small saucepan, heat gently until all the sugar dissolves, then boil it until it reaches a temperature of 118’C. Slowly add this sugar syrup to the whisking egg mixture, drizzling it down the side of the bowl, then continue whisking until the egg mixture is cool. Fold in melted chocolate, then the cream. Chill for at least a few hours or overnight, to set.

Comments (81)

Tags: , , , , ,

Milk and Cereal, for Tara

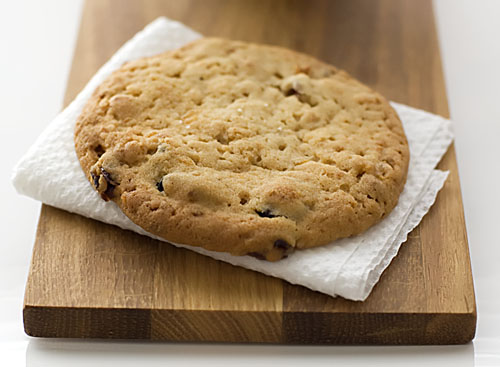
MilkandCereal-Cookie

(Milk and Cereal Cookie)

Tara will forgive me, I hope. It has taken me well and above what anyone would politely consider a reasonable gap between promise and deliverance of this recipe. If it’s any consolation, I blame the cookie’s deliciousness. It took several batches before I finally managed to hang on to a single cookie long enough to take a picture of it.

This milk and cereal cookie combines my favourite components from two Momofuku Milk Bar cookies : the chewiness factor from the cornflake cookie, and the milky richness of the blueberry and cream cookie.

The main revelation for me, apart from the wonderment of the milk crumble (which I imagine could form an interesting garnish for a ‘peaches and cream’ dessert), was the use of glucose in the cookie dough which made it crazily, amazingly and rather giddy-headedly, chewy. I have taken out some of the sugar from the original recipe, and am happy with the sweetness level it now stands at. If you like, you can omit a bit more caster sugar and the cookie will still be pretty chewy. Bear in mind however, that every gram you remove from the recipe, is one less gram of fun that you’re sucking out of the cookie!

Milk and Cereal Cookies :
(based on a combination of recipes by Christina Tosi of Momofuku Milk Bar)

312g plain flour
1/4 teaspoon baking powder
1/8 teaspoon baking soda
2 teaspoons salt
226g unsalted butter
100g caster sugar
100g light brown sugar
100g glucose
1 large egg
40g cornflakes, crushed
70g milk crumbs (recipe below)
50g dried cranberries or dried blueberries (optional)

Line two baking sheets with baking paper; set aside.

In a bowl, mix together the flour, baking powder, baking soda and salt; set aside.

In the bowl of an electric mixer fitted with the paddle attachment, cream the butter and both the sugars. Add the glucose and mix until well combined. Add the egg, mixing to combine, then fold in the flour mixture, followed by the cornflakes, milk crumbs and dried berries (if using).

Using an ice-cream scoop about 2 1/8 inch in diameter, scoop dough into balls and place them about 2 inches apart on the prepared baking sheets.

Preheat the oven to 190’C. Transfer baking sheets to refrigerator until dough is chilled, about 15 minutes. [Note: You can bake them straight away instead of chilling, if you can’t wait. The resulting cookies will be slightly flatter] Transfer baking sheets to oven and bake, rotating pans halfway through baking, until cookies are golden brown and tops begin to crackle, about 15 minutes.

Transfer cookies to a wire rack to cool.

Milk crumbs :
(This makes more than you need, but the crumbs are a delicious addition to other things, such as muffins)

1/4 cup plus 1 tablespoon skim milk powder
2 tablespoons plain flour
1 tablespoon cornflour
1 1/2 teaspoons sugar
1/8 teaspoon salt
20g unsalted butter, melted
1/4 cup white chocolate buttons, melted

Preheat the oven to 110’C. Line a baking sheet with baking paper; set aside.

In a medium bowl, whisk together 2 tablespoons plus 1 1/2 teaspoons milk powder, flour, cornflour, sugar and salt. Stir in the melted butter until well combined. Spread mixture on prepared baking sheet. Bake until dried and crumbly, about 12 minutes. Remove milk crumble from oven and let cool completely.

Transfer milk crumble to a large bowl and fold in remaining 2 tablespoons plus 1 1/2 teaspoon milk powder and melted white chocolate. Use immediately or transfer to an airtight container and keep refrigerated until ready to use.

Comments (37)

Tags: , , ,

Having your cake and eating your tart too

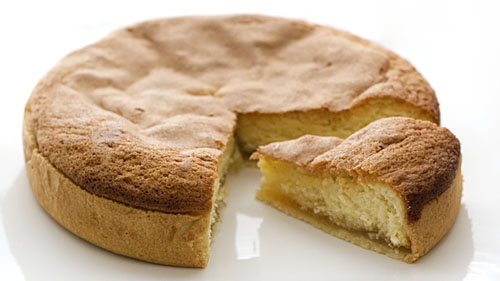
PineappleCakeTart

(Ananastaart : Pineapple Tart)

Brown food, it has to be acknowledged, is not the easiest thing to capture in enticing light. For someone who bakes, golden brown is probably one of the most attractive colours you could pull out of the oven. But for someone who also tries to take pictures of their baked goods, the same colour can be quite challenging to make look appetising.

I’ve noticed that I bake a lot of brown things, and that’s probably why I end up baking more than I blog. Let’s just say, for the majority of the time, I’d rather be eating than trying to take pictures of brown food 🙂

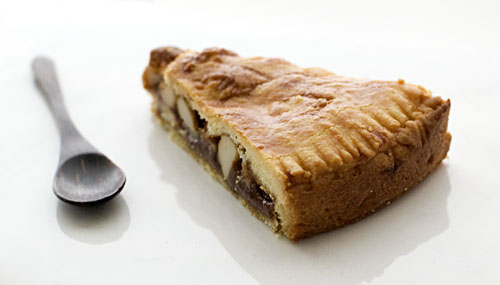
EngadineTart

(Engadiner Nusstorte : Swiss Walnut and Toffee Pie)

This Engadiner Nusstorte, made a week ago, was so delicious that I struggled to hang on to that last piece in order to take a picture. Early on in the week, I sternly pointed to the remaining slice in it’s plastic container, declaring to B that it was Strictly Photo Pie, so Hands Off. Even so, I managed to secretly (I think) shave bits off the slice until it was nearly in danger of becoming non-existent. Not long after a picture was finally taken and the pie was relegated back to Edible status, the slice disappeared.

The reason why I was so adamant about taking a picture this time was because I wanted to highlight a cookbook I bought recently, that has rapidly become one of my current favourites : Warm Bread and Honey Cake by Gaitri Pagrach-Chandra.

I love a cookbook that respects baking audiences enough to use not only cup measures, but also weight measures in grams and ounces. It also scores highly with me if it happens to feature a collection of interesting pictures, and not just ones that have been styled to the hilt. For example, check out p301 to see how kataifi pastry is traditionally made.

It also extends beyond what you’d expect from a typical baking book. There are none of the usual suspects here – no chocolate brownies or endless variations on a single cupcake recipe. Instead, Warm Bread and Honey Cake plays host to a fantastic collection of unusual recipes such as a pink-tinted Caribbean coconut roll (Salara), Chilean layered ‘drunken’ apple cake (Kuchen Borracho), Chinese steamed red bean buns, a whole chapter on Turkish sweets and savouries, and many lovely looking Dutch recipes (the author also has a book on Dutch baking called Windmills in my Oven).

Not to mention the pineapple cake tart above either. Cake and tart in one hit? What’s not to like? It was delicious, but perhaps slightly overshadowed by the power of a pie that encases nuts and toffee in a single breath. The recipe for the pie is below.

Swiss Walnut and Toffee Pie :
(Engadiner Nusstorte or Bündner Nusstorte, from Warm Bread and Honey Cake by Gaitri Pagrach-Chandra)

Pastry :
300g plain flour
1/4 teaspoon salt
150g butter, chilled and cubed
100g icing sugar
1 egg, beaten

Filling :
250g caster sugar
2 tablespoons water
2 tablespoons honey, light corn syrup or liquid glucose
150ml double (heavy) cream, warmed
250g walnuts, coarsely chopped [Note : I used macadamia nuts]

Make the pastry first. In a large bowl, mix the flour and salt. Rub in the butter until the mixture resembles fine breadcrumbs. Add the icing sugar and rub in until well incorporated. Or simply put all the ingredients in a food processor and pulse until it resembles fine breadcrumbs, then transfer to a bowl.

Reserving 2 tsp egg, add the rest to the bowl and use your fingertips to bring it together. Add a few drops of water if necessary. Cover with clingfilm and chill while you make the filling.

Have a pair of oven mitts standing by. Put the sugar, water and honey in a large heavy-based saucepan over medium heat. Stir gently to dissolve the sugar. Bring to the boil and let it continue to boil until it becomes a dark golden colour. Stir from time to time.

Put on the oven mitts and pour the warm cream into the saucepan in a steady stream, stirring continuously. It will hiss and bubble ferociously, but the mitts should protect your hands and arms. Keep on stirring the mixture on medium heat until it is creamy and slightly thickened. To test, pour 1 tsp onto a cold saucer and tilt it after a few seconds. The mixture should spread slowly and not disintegrate into rivulets. Remove the saucepan from the heat and stir in the walnuts, coating them well. Set aside to cool.

Preheat the oven to 180’C. Grease a 24cm springform tin.

To assemble the pie, the pastry should be chilled but still malleable, or it will break when you roll it. Divide the pastry into two portions, one slightly larger than the other. Roll out the larger portion between two sheets of clingfilm to a 30cm circle and use it to line the tin. (Use the bottom sheet of clingfilm to help move it, removing the sheet once the pastry is in place). Press the edges of the pastry against the side of the tin.

Scrape the filling onto the pastry. Level the top as well as you can, but don’t apply too much pressure, or you may tear the pastry and the filling will leak out. Fold the excess pastry inwards over the filling.

Roll the second piece of pastry to a neat 22cm circle. Trim if necessary. Moisten the edges of the pastry base in the tin with a little water and position the second pastry circle on top of this. Use a fork to crimp and seal the edges. Brush with the reserved egg and prick with a fork in several places. If you like, you can score a plaid pattern onto the surface with the fork.

Bake for 35-40 mins, or until golden brown. Leave to cool until lukewarm in the tin, then loosen the sides, release the clip and carefully transfer the pie to a wire rack to cool completely.

Comments (72)

Tags: , , , , ,