Spring Tea Party : Butterfly Cupcakes

Would you believe, a group of butterflies is called a kaleidoscope?

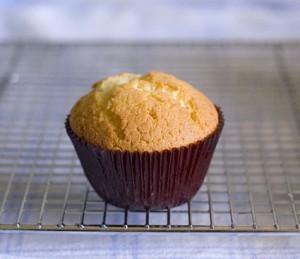
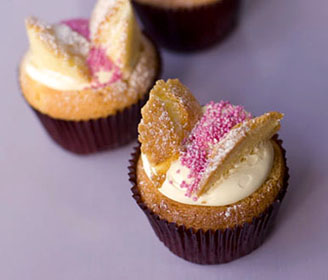
A Spring Tea Party is about to be held at The Skinny Gourmet, and while the weather here is working it’s way into Winter, there’s no reason not to get the tea cups out and be a little Spring-inspired, with a kaleidoscope of Butterfly Cupcakes.

When my age was still in single digits, I used to sit out in the garden, having pretend tea parties with dolls for company and leaves and flowers for cakes. I still recall a picture in one of my mom’s cookbooks, of some butterfly cakes that in my eyes, had a touch of the exotic to them. Well it’s taken a good few years for me to finally make some.

I prepared similar cakes a couple of months ago for a post-show party for a ballet. They were canape-sized butterfly cakes, which until then, I never would have thought would make good finger food. As they’re pretty easy to prepare, they would be very suitable for a kids’ tea party too. This big kid certainly thinks so! 🙂

Butterfly Cupcakes :
(serves 12; adapted from a Delia Smith recipe in her Book of Cakes)

175 g self-raising flour
110 g unsalted butter, at room temperature
110 g caster sugar
2 large eggs
1 teaspoon vanilla extract
grated rind of 1 lemon
pinch of salt

Preheat the oven to 190’C.

Cream the butter and sugar until smooth, add the eggs one at a time, beating well between each addition. Mix in the vanilla and lemon rind, then the sifted flour and salt. Beat this mixture until just combined.

Divide the mixture between 12 cupcake cases and bake for 15-20 minutes until the cakes are golden brown. Allow them to cool completely on a wire rack.

[To decorate, angle a small sharp knife and cut to within about 1 cm of the edge of the cake to remove a cone-shaped round, leaving a cavity in the centre. Cut the round in half and set aside. These are the wings. Fill the centre of each cake with jam and whipped vanilla cream (or a filling of your choice. Delia Smith uses orange curd] and return the two pieces of cake to sit on top like butterfly wings. You can also decorate further with coloured sprinkles, grated chocolate, etc. Dust with icing sugar to serve.]

Comments (7)

Für Elyse

Don’t they look great? Just wait til you hear what they’re called.

Are you ready?

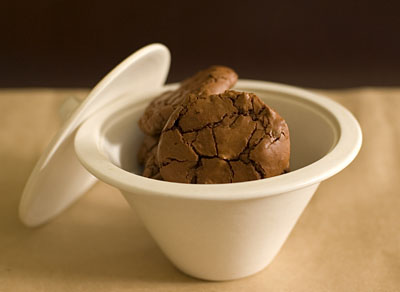
Chocolate Brownie Cookies.

I know! Chocolate. Brownie. Cookies!

Three of my favourite words, in the form of a bite-sized snack. Genius, isn’t it? You should smell them while they’re baking. The chocolate aroma is so intense, it’s like someone managed to capture the pure essence of chocolate, in a scent. That person, is Claudia Fleming, and these cookies were one of her signature items during her time as Pastry Chef at the Gramercy Tavern.

Of course, these cookies are great eaten as they are. They have a crisp shell on top, and a moist, chewy brownie-like middle bit. If you want to gild the lily a little, I suggest sandwiching them with ice-cream. I usually like my home-baking to be simple and uncomplicated by extra bits and bobs, but trust me, ice-cream sandwiches made with these cookies are intensely good!

These cookies are dedicated to Elyse and her dad, Lou, in Connecticut. Hello! 🙂

Chocolate Brownie Cookies :
(from The Last Course, by Claudia Fleming)

45g plain flour
1/4 teaspoon baking powder
1/8 teaspoon salt
2 large eggs
150g sugar
1/2 tablespoon brewed espresso
1 teaspoon vanilla extract
30g unsalted butter
141g extra-bittersweet chocolate, chopped (66%-80%)
56g unsweetened chocolate, chopped
3/4 cup mini chocolate chips [I used 30g cocoa nibs instead]

Preheat oven to 190’C. Line 2 baking trays with baking paper.

In a small bowl, whisk together the flour, baking powder, and salt. Set aside.

In the bowl of an electric mixer, briefly whip the eggs to break them up. Add the sugar, espresso, and vanilla and beat on high speed for 15 minutes, until thick.

While the eggs are whipping, place the butter in the top of the double boiler, or in a metal bowl suspended over a pot of simmering (not boiling) water, and scatter the extra-bittersweet and unsweetened chocolate on top. Heat until the butter and chocolate melt. Remove the boiler top from over the water and stir the chocolate and butter until smooth.

Gently fold the chocolate mixture into the egg mixture until partially combined (there should still be some streaks). Add the flour mixture to the batter and carefully fold it in. Fold in the chocolate chips. If the batter is very runny, let it rest until it thickens slightly, about 5 minutes.

Drop the batter by heaping teaspoonsfuls onto the prepared baking sheets and bake until puffed and cracked, 8 to 9 minutes. Cool on a wire rack before removing from the baking trays.

[Note: Yield for this recipe is supposed to be 5 dozen, but I got 42 cookies. Maybe my teaspoons are greedier 🙂 ]

Comments (9)

Castagnaccio

Plainsboro Lunch Lady: [serving sloppy joe sandwiches at school lunchtime] They’re not really bad if you’ve never had really good ones.
–Rocket Science, 2007.

Remember Little Miss Sunshine? I watched it, not knowing too much about it, and was completely charmed by the movie and delighted by how unexpectedly good it was. I recently watched Rocket Science and had a similar feeling of happy discovery. Rocket Science is a bittersweet and very human comedy, and was made by Jeffrey Blitz, who also brought us Spellbound, that completely engrossing documentary about the 1999 National Spelling Bee held in Washington DC.

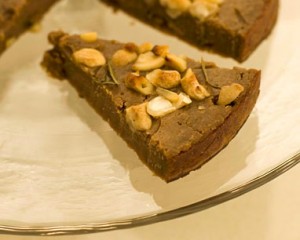
Happy discovery, is also my reaction to this Castagnaccio, a flat Italian chestnut flour cake which is a speciality of an Italian province, Lucchesia.

The first time I tried this cake was when Jaci and I attempted to bake one at work, several years ago. Never having tasted Castagnaccio before and not knowing what to expect, we found it really odd tasting, to the point of being unpalatable, and ended up throwing most of it in the bin (heart-breaking, when you know how much chestnut flour costs). We even considered writing to the cookbook author (it was either Stephanie Alexander or Maggie Beer; I can’t remember which) to query the logic behind the inclusion of the recipe in the book! In hindsight, I think our cake did not turn out well because the chestnut flour had soured. I didn’t know this then, but chestnut flour doesn’t keep very well. It should ideally be stored in the freezer and used within 6 months.

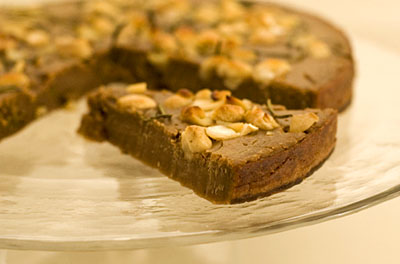
This time round, emboldened by a reliable cookbook by Anna del Conte and a bag of chestnut flour that would go to waste if I did not utilise it soon, I decided to reattempt the Castagnaccio. With great relief, the cake emerged triumphantly from the oven, brown like a roasted chestnut, and fragrant with rosemary. A wedge of this cake, eaten warm, not long after had been out of the oven, was very soothing, and the combination of rosemary and chestnut worked a treat. Having said that, I can imagine this cake would have it’s share of detractors as well. It has a pasty pudding-like texture that reminds me of some asian desserts/cakes I grew up eating. While I’m not a fan of most asian cakes, I quite like Castagnaccio.

Not only did I find it tasty, but now that I think about it, this cake isn’t actually all that bad for you either. It doesn’t contain any eggs, butter or gluten (ie. dairy-free and coeliac friendly!). It has the merest two tablespoons of sugar, which Anna del Conte added to her version of the recipe because she says a little sugar brings out the flavour of the chestnut flour which would not have as much depth of flavour unless you managed to source Tuscan chestnut flour. Omit the sugar, and you have a diabetic-friendly cake too.

Castagnaccio, topped with nuts and rosemary, is my contribution to this month’s Heart of the Matter, hosted by Michelle of The Accidental Scientist.

Castagnaccio :
(serves 6; recipe from Classic Food of Northern Italy, by Anna del Conte)

75g sultanas
300g chestnut flour
a pinch of salt
2 tablespoons caster sugar
3 tablespoons extra virgin olive oil
40g pine nuts [I didn’t have these at hand, so I used cashews instead]
1 tablespoon fresh rosemary needles

Soak the sultanas in warm water for 20 minutes, then drain them.

Heat the oven to 200’C.

Sift the chestnut flour into a bowl. Add the salt and sugar and about 400ml of cold water to make a smooth soft batter. Stir in 2 tablespoons of the oil and the sultanas.

Grease a metal tin with oil. The tin, which traditionally should be rectangular, must be large enough to allow the mixture to spread to a thickness of about 2cm. Pour in the chestnut batter and sprinkle the top with the pine nuts and rosemary needles. Drizzle the rest of the oil over and bake until the top is crisp and cracked and a lovely deep brown colour, about 25 to 40 minutes.

[I used a round cake tin which meant the batter was slightly less than 2 cm thick, and the baking time was reduced].

Comments (9)

« Previous Page · Next Page »