I made this! Pt. 5

Debbie Brown was enthralling us with the details of her itinerary for the next two weeks which sounded extremely jam-packed, not to mention her trip to Las Vegas after leaving Sydney, to conduct a class at Cake Camp (I want to go to Cake Camp!). Do you ever take a break, someone asked? Debbie smiled and replied, Well, no, I guess I’m pretty lucky, because I love what I do.

To the uninitiated, Debbie Brown is the legendary UK cake decorator and also the author of a whopping 14 books on cake decorating (my favourite is her whimsical and delightful Enchanted Cake book). When I heard she was going to be a guest instructor at Planet Cake, I excitedly signed up for her Bewitching Mermaids class.

To think, this was the cake that almost never was. I’d been trying to sell my place at this cake class, a few months after signing up for it, due to work commitments. As I couldn’t find any takers, I ended up attending the class. How glad I was, that I did.

Last Saturday morning, I walked into the Mermaids class feeling a little bleary eyed and weary from work. My mood immediately lifted upon being greeted by Paris herself, and then by the wonderfully effervescent Handi, who was acting as assistant for that class. It’s the reason why I keep coming back to Planet Cake to attend their courses. These classes are like a sanctuary of calm and sugary delight. A group of strangers come together, talk cake, enthuse over each other’s creations and at the end of the day, learn a new skill and walk away with their very own amazingly decorated cake that makes the whole experience worth every single cent.

This has been by far the easiest Planet Cake class I’ve participated in. Once the cakes were covered with fondant (which didn’t take long at all, since they were meant to represent an irregularly shaped pile of rocks), the fun began, decorating the cakes with mermaids and sea creatures. In my opinion, the beauty about this cake is that it’s potential to be taken into different directions, is limitless. The simple pile of rocks can be transformed into almost any location whatsoever – a jungle, a garden scene, ski slopes.. Or if you wanted to stick to the water theme, there are a myriad other oceanic creatures that could inhabit your cake (seahorses and mini nemos, come to mind).

So thank you once again to everyone at Planet Cake for holding these great classes and a special thank you to Debbie Brown for coming to Sydney!

(My Mermaids cake went to Erin, who celebrated her 10th birthday on Sunday. Happy Birthday Erin!)

Planet Cake
106 Beattie Street
Balmain 2041.

Comments (28)

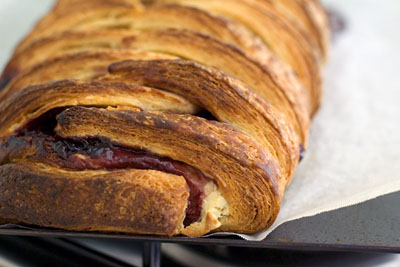
Daring Bakers Challenge : Cherry and Cream Cheese Danish Braid

It’s aliiiiiive!

Did I ever tell you that I’ve always wanted to be an extra in a b-grade film? I think I would have made a kick-ass shopping mall zombie or a skeleton warrior that gets felled by Bruce Campbell in Army of Darkness. Need a scream on cue? All I have to do is shut my eyes and recall the time I dropped a bag of icing sugar that went pfloopf down my jeans and all over the kitchen floor. Shriek.

Meanwhile, I can only dream while in my kitchen, hunched over the oven and peering through the glass, going, “Master! Master! The danish.. it’s aliiiiive!”

Baking with yeast has that kind of effect on me. I still get a childish glee from seeing magic happen in the oven. So it was with great joy that I discovered this month’s Daring Bakers Challenge, as chosen by Kelly and Ben was going to be a danish braid.

I have to confess, I’ve made this particular danish recipe before. It was more than a year ago, when I needed to make some danishes and was testing out a few recipes I had at hand. While the end result was delicious, it wasn’t what I was looking for in a danish. Still, there were several aspects about the danish that I really liked, and I ended up incorporating elements of it into my final recipe.

Danishes are one of those breakfast or tea time foods that I don’t indulge in often. For something sweet to start the day, I’d much rather have brioche, or a little muffin. That said, I love making danishes. Danish dough usually has that pleasant plumpness and smoothness that makes it a joy to work with (this particular recipe however, I found quite tough to roll out), and I love watching the pastry expand and brown in the oven. If you have the time, a home-made danish is one thing that is well worth the trouble – even if they might not turn out looking as professional as something you’d find at the shops, they always seem to taste infinitely better than anything you could buy.

Danish dough :
(the measurements in brackets are my own conversions)

For the dough (detrempe):
28g fresh yeast or 1 tablespoon active dry yeast
1/2 cup (140g) whole milk
1/3 cup (85g) sugar
zest of 1 orange, finely grated
3/4 teaspoon ground cardamom
1 1/2 teaspoons vanilla extract
1/2 vanilla bean, split and scraped
2 large eggs, chilled
1/4 cup (80g) fresh orange juice
3 1/4 cup (560g) plain flour
1 teaspoon salt

For the butter block:
226g cold unsalted butter
1/4 cup (45g) plain flour

Dough (detrempe):
Combine yeast and milk in the bowl of a mixer fitted with the paddle attachment and mix on low speed. Slowly add sugar, orange zest, cardamom, vanilla extract, vanilla seeds, eggs, and orange juice. Mix well. Change to the dough hook and add the salt with the flour, 1 cup at a time, increasing speed to medium as the flour is incorporated. Knead the dough for about 5 minutes, or until smooth. You may need to add a little more flour if it is sticky. Transfer dough to a lightly floured baking sheet and cover with plastic wrap. Refrigerate for 30 minutes.

Butter Block:
Combine butter and flour in the bowl of a mixer fitted with a paddle attachment and beat on medium speed for 1 minute. Scrape down the sides of the bowl and the paddle and then beat for 1 minute more, or until smooth and lump free. Set aside at room temperature.

After the detrempe has chilled 30 minutes, turn it out onto a lightly floured surface. Roll the dough into a rectangle approximately 18 x 13 inches and ¼ inch thick. The dough may be sticky, so keep dusting it lightly with flour. Spread the butter evenly over the center and right thirds of the dough. Fold the left edge of the detrempe to the right, covering half of the butter. Fold the right third of the rectangle over the center third. The first turn has now been completed. Mark the dough by poking it with your finger to keep track of your turns, or use a sticky and keep a tally. Place the dough on a baking sheet, wrap it in plastic wrap, and refrigerate for 30 minutes.

Place the dough lengthwise on a floured work surface. The open ends should be to your right and left. Roll the dough into another approximately 13 x 18 inch, ¼-inch-thick rectangle. Again, fold the left third of the rectangle over the center third and the right third over the center third. No additional butter will be added as it is already in the dough. The second turn has now been completed. Refrigerate the dough for 30 minutes.

Roll out, turn, and refrigerate the dough two more times, for a total of four single turns. Make sure you are keeping track of your turns. Refrigerate the dough after the final turn for at least 5 hours or overnight. The danish dough is now ready to be used. If you will not be using the dough within 24 hours, freeze it. To do this, roll the dough out to about 1 inch in thickness, wrap tightly in plastic wrap, and freeze. Defrost the dough slowly in the refrigerator for easiest handling. Danish dough will keep in the freezer for up to 1 month.

Comments (36)

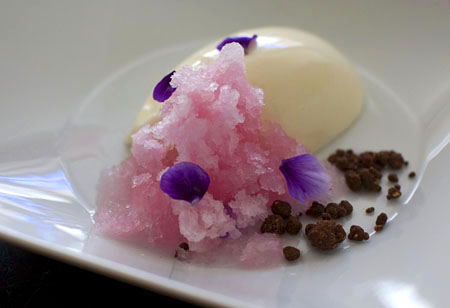
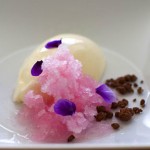
Lavender granita, yogurt jelly.

We use a lot of baby herbs and flowers at work. The flowers are tiny little bright coloured buds shipped all the way from Melbourne. Some are even from the Pastry Chef’s garden.

Baby sorrel, amaranth, lambs tongue, marigolds, viola, violets, lavender, rose.

Beautiful feminine edifices of nature that thick, clumsy and scarred hands occasionally struggle to handle. It seems almost contradictory that such a hot, sweaty and harsh environment can produce poetry on a plate. As if a raging coal factory could weave the finest silk from it’s fiery depths. There’s a raw fish dish for example, that has a different baby leaf on each piece of diced tomato. On a different dish, capers are arranged across the plate in what appears to be a study in controlled chaos. It’s intensely beautiful, because it appears to be so of-the-moment, even when each step is planned with precision. As for the desserts, what can I say. I’m inspired every day I work with the Pastry Chef.

I’ve been thinking a lot about colours lately, and flavour pairings. I was always a bit of a rough and tumble kid, growing up, and I think it shows a little in the food I make as well. Gradually, I hope I’m learning to embrace the prettier side of things. Flowers, are a good place to start. 🙂

Lavender, I’ve been told, doesn’t keep well. At a bistro I worked at several years ago, we stored the dried buds sealed and well chilled. Their taste alters over time, and with that in mind, I thought to make good use of the lavender I had bought recently, while it was still in its prime.

A lavender flavoured granita seemed like a good idea. It’s something I have not tried making before, and the delicate pink colour that results from infusing the lavender in the liquid really has to be seen to be believed! The recipe comes from one of my favourite books, by Janni Kyritsis.

Lavender granita, served with a light yogurt jelly, is my contribution to Mike’s Frozen Desserts event. You can make almost anything into a granita, even beer. If granita isn’t really your thing, you can also use lavender to make this or this.

Lavender granita :
(from Wild Weed Pie, by Janni Kyritsis)

1/2 bunch fresh French lavender (yielding 1/2 packed cup flowers)*
1 litre water
250g castor sugar
100ml strained lemon juice

Combine flowers with half the water and bring to the boil. Set aside until lukewarm. Strain, reserving liquid and squeezing flowers well to remove as much liquid as possible. Add sugar to strained liquid and stir well to dissolve, then add remaining water and lemon juice. Pour into a shallow metal tray and place in the freezer. When it has just started to freeze (it will take a few hours to freeze completely, depending on the freezer), scrape with a fork to create granita flakes and return to freezer. Repeat scraping a few more times during freezing and again just before serving.

*I used 10g dried lavender instead.

Comments (38)

« Previous Page · Next Page »