Daring Bakers Challenge : Cheesecake


Brie and white chocolate cheesecake, pecans and celery

The April 2009 challenge is hosted by Jenny from Jenny Bakes. She has chosen Abbey’s Infamous Cheesecake as the challenge.

I guess I’ll start by being completely honest and saying that I’m not a huge fan of cheesecake. The only cheesecake I would ever pay money for, comes from Yellow Bistro in Potts Point. Other than that, I’ll eat it if placed in front of me (because I’ll try anything at least once), but only with great dismay at the thought of there being so many other delicious things I could be putting on my hips instead.

The idea for the Brie cheesecake came from a chance conversation with Lorraine about cheesecakes. Somehow the word “cheeseplate cheesecake” was thrown out there and at some point we even contemplated collaborating to create an entire platter of cheeseplate-themed cheesecakes. Unfortunately, time and busy lives prevented this from occuring.

I know it is a little cliched that I have decided to present this as a ‘deconstructed’ cheesecake. The idea has been done to death before, but I thought the presentation would really suit the cheeseplate theme. The Brie flavour in this cheesecake is actually quite subtle. If you eat it alone, you will find that the cream cheese and white chocolate flavours are dominant, while the Brie-ness is only more apparent at the finish. However, the flavour really comes to the fore when you take a bite with the accompanying candied (and slightly salty) celery.

Brie and white chocolate cheesecake, pecans and celery :
(This recipe is a combination of Abbey’s Infamous Cheesecake, and a Brie-white chocolate cheesecake from Pure Chocolate by Fran Biglow)

Brie and white chocolate cheesecake :
270g cream cheese
65g caster sugar
40g white chocolate
2 eggs
135g triple cream brie (weight after rind has been removed)
1/4 teaspoon vanilla extract

Preheat the oven to 150’C.

Melt the white chocolate in the microwave in a double boiler. Set aside to cool.

In a mixer with the paddle attachment, beat the cream cheese on medium-high speed until smooth, about 3 minutes. Transfer the cheese to a separate bowl and set aside.

In the same mixing bowl using the paddle attachment, beat the Brie until completely smooth. With the machine still going, gradually add the cream cheese to the Brie, scraping down the sides of the bowl. Add the sugar, then the eggs, one at a time. Pour in the melted white chocolate and continue to mix until well blended and smooth. Pour into a baking dish and bake it in a waterbath for about 55 minutes (it may take longer depending on the size of your dish). The cheesecake should have a slight jiggle to it. Remove from the oven and allow to cool completely in the waterbath, then cover and put in the fridge to chill.

Pecan ‘crust’ :
110g plain flour
3/4 teaspoon baking powder
70g unsalted butter
65g light brown sugar
30g pecans, roughly chopped

Combine the flour, baking powder in a bowl. Rub in the butter then add the brown sugar and pecans. Scatter this mixture on a lined tray and bake at 170’C for about 35 minutes until browned. Stir the mixture occasionally during the baking time, to ensure even cooking.

Celery confit :
(based on recipe in Wild Sweets by Dominique and Cindy Duby)
100g celery stalks
150ml sugar syrup
50ml water
1/4 teaspoon sea salt
1/2 teaspoon yuzu (or lemon) juice

Trim stalks and remove filaments with a paring knife. Using a potato peeler, shave long vertical strips the length of the stalk.

Bring the syrup, water, salt and yuzu to a boil. Taste and adjust with more salt if necessary. The salt is important to balance the sweetness. Add the celery and cook until soft and translucent, about 3 to 5 minutes. Remove from syrup and chill until required.

To assemble :
Spoon the baked cheesecake mixture into a food processor. Process briefly until smooth.

Place a teaspoonful of cranberry relish or jam on the plate (this is optional). Scatter the pecan crust over this. Arrange a spoonful of cheesecake mixture on top of the crust. Serve alongside the candied celery strips.

Comments (82)

Tags: , ,

Daring Bakers Challenge : Lasagne

The March 2009 challenge is hosted by Mary of Beans and Caviar, Melinda of Melbourne Larder and Enza of Io Da Grande. They have chosen Lasagne of Emilia-Romagna from The Splendid Table by Lynne Rossetto Kasper as the challenge.

I had my first taste of lasagne when I was about ten. I still remember it, not for it’s culinary excellence, but because I was obsessed with Garfield at the time, and lasagne was Garfield’s favourite food. I also recall the moment clearly because I was in awe at my friend’s glamorous mother who, from her glamorous kitchen, pulled out this glass casserole dish of mysterious lasagne.

I have eaten a few more lasagnes since then. Mom would make us her deliciously inauthentic versions on occasion – my favourite bit was always the crispy golden crust on top. Somehow though, lasagne never equated to me as something I craved on a regular basis. In fact, I can’t even remember the last time I ate, let alone baked, a lasagne.

Until, that is, this month’s DB challenge. The choice of lasagne took me by surprise, but I welcomed it with open, floury arms, relishing the idea of making a lasagne entirely from scratch. Pasta and all! Foregoing the purchase of a pasta machine, I decided to hand roll my pasta, which I knew would be a challenge unto itself, on account of my weedy arms. So I strugged, and broke into a sweat, and struggled some more. All this, whilst trying to channel my two very un-Italian/extremely-Chinese grandmothers; one of whom made noodles by hand on a daily basis for her large family, and the other still has the patience to make thousands of miniature deep fried spring rolls, each one thinner than a pencil. The end result, after much sponging of the brow and discrete swearing under the breath, was well worth the effort, with B giving the dish a big thumbs up.

Of the three recipes provided for this challenge, I completed two : the spinach pasta and the bechamel sauce. Instead of the ragu, I went vegetarian and opted to make a basic tomato sauce. Since the recipes are quite long, I’m only including the spinach pasta recipe in this post, which I would unhesitatingly make again.


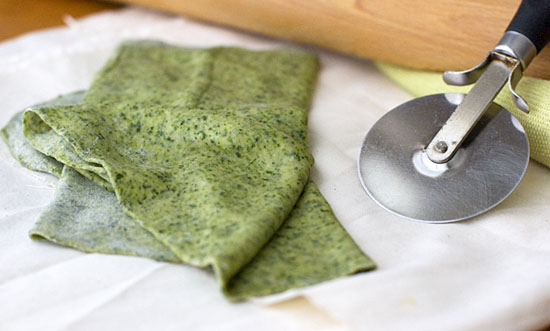
(Pictured : Spinach pasta sheet, rolling pin, cutter and extra cloth for sponging brow)

Spinach Egg Pasta (Pasta Verde) :
(Makes enough for 6 to 8 first course servings or 4 to 6 main course servings, equivalent to 450g dried boxed pasta; based on the recipe for the lasagne of Emilia-Romagna)

2 jumbo eggs (60g or more)
300g fresh spinach, rinsed dry, and finely chopped; or 170g frozen chopped spinach, defrosted and squeezed dry
400g all purpose unbleached (plain) flour [I used Italian OO flour]

Mixing the dough:
Mound the flour in the center of your work surface and make a well in the middle. Add the eggs and spinach. Use a wooden spoon to beat together the eggs and spinach. Then gradually start incorporating shallow scrapings of flour from the sides of the well into the liquid. As you work more and more flour into the liquid, the well’s sides may collapse. Use a pastry scraper to keep the liquids from running off and to incorporate the last bits of flour into the dough. Don’t worry if it looks like a hopelessly rough and messy lump.

Kneading:
With the aid of the scraper to scoop up unruly pieces, start kneading the dough. Once it becomes a cohesive mass, use the scraper to remove any bits of hard flour on the work surface – these will make the dough lumpy. Knead the dough for about 3 minutes. Its consistency should be elastic and a little sticky. If it is too sticky to move easily, knead in a few more tablespoons of flour. Continue kneading about 10 minutes, or until the dough has become satiny, smooth, and very elastic. It will feel alive under your hands. Do not shortcut this step. Wrap the dough in plastic wrap, and let it relax at room temperature 30 minutes to 3 hours.

Stretching and Thinning:
With a regular-length rolling pin, roll out a quarter of the dough at a time and keep the rest of the dough wrapped. Lightly sprinkle a large work surface with flour. The idea is to stretch the dough rather than press down and push it. Shape it into a ball and begin rolling out to form a circle, frequently turning the disc of dough a quarter turn. As it thins outs, start rolling the disc back on the pin a quarter of the way toward the center and stretching it gently sideways by running the palms of your hands over the rolled-up dough from the center of the pin outward. Unroll, turn the disc a quarter turn, and repeat. Do twice more.

Stretch and even out the center of the disc by rolling the dough a quarter of the way back on the pin. Then gently push the rolling pin away from you with one hand while holding the sheet in place on the work surface with the other hand. Repeat three more times, turning the dough a quarter turn each time.

Repeat the two processes as the disc becomes larger and thinner. The goal is a sheet of even thickness. For lasagne, the sheet should be so thin that you can clearly see your hand through it and see colours. Cut into rectangles about 10 x 20 cm. Note: Enza says that transparency is a crucial element of lasagne pasta and the dough should be rolled as thinly as possible. She says this is why her housekeeper has such strong arms!

Dry the pasta at room temperature and store in a sealed container or bag.

Comments (53)

Tags: ,

Daring Bakers Challenge : Chocolate Valentino Cake

The February 2009 challenge is hosted by Wendy of WMPE’s blog and Dharm of Dad ~ Baker & Chef. We have chosen a Chocolate Valentino cake by Chef Wan; a Vanilla Ice Cream recipe from Dharm and a Vanilla Ice Cream recipe from Wendy as the challenge.

But where’s the cake, I hear you ask. It’s there, I promise you! When I made this, it was nearing Valentines Day, and the truth is, B and I don’t “celebrate” Valentines, so a heart shaped cake seemed a little pointless. True, I could have given it away to more romantically-inclined friends, but the other truth is that I wanted to eat this cake. Wanted to, as soon as it was pulled from the oven and had cooled sufficiently for an impatient knife to slip in and extract the meerest sliver for a taste test. At the union of cake and mouth, a roar of approval from gleeful tastebuds could be heard from far and wide. Thank you, Dharm and Wendy, I whispered into someone’s ear. Pass it on!

After more rigorous taste-testing, I thought I would have a little fun with presenting this month’s challenge. We’ve all seen cake ice-cream cones around before, but I’ve never tried making my own version of them.

If you’re finding yourself that way inclined as well, here’s what to do :

With the incredibly moist, chocolatey flesh of the baked Valentino cake, scoop mini cake balls with a melon baller or a small ice-cream scoop. If you’re having a Martha moment, you can also pipe vanilla ice-cream into the cavity of the cone, before topping with the cake and dipping the whole in chocolate. Anoint with sprinkles, and share with someone you love.

Chocolate Valentino Cake :
(from Sweet Treats by Chef Wan)

454 grams of semisweet chocolate, roughly chopped [I used chilli flavoured chocolate]
146 grams total of unsalted butter
5 large eggs separated

1. Put chocolate and butter in a heatproof bowl and set over a pan of simmering water (the bottom of the bowl should not touch the water) and melt, stirring often.
2. While your chocolate butter mixture is cooling. Butter your pan and line with a parchment circle then butter the parchment.
3. Separate the egg yolks from the egg whites and put into two medium/large bowls.
4. Whip the egg whites in a medium/large grease free bowl until stiff peaks are formed (do not over-whip or the cake will be dry).
5. With the same beater beat the egg yolks together.
6. Add the egg yolks to the cooled chocolate.
7. Fold in 1/3 of the egg whites into the chocolate mixture and follow with remaining 2/3rds. Fold until no white remains without deflating the batter.
8. Pour batter into prepared pan, the batter should fill the pan 3/4 of the way full, and bake at 190’C
9. Bake for 25 minutes until an instant read thermometer reads 60’C.
10. Cool cake on a rack for 10 minutes then unmold.

Comments (59)

Tags: , , ,

« Previous Page · Next Page »