Honeyed lips : Baklava
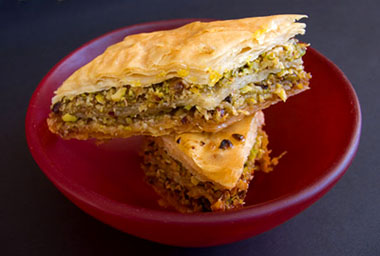
The second edition of A.W.E.D., kickstarted by Dhivya of Culinary Bazaar, features Middle Eastern Cuisine. For it, I have made Baklava, that sticky and aromatic sweet featuring an abundance of nuts and honey between layers of fine pastry. It is widely regarded as one of the most well known and popular of Middle Eastern sweets, and I am quite happy to be a fan of it, regardless of it’s exact provenance.
I know quite a few people who would screw their face up at the idea of eating baklava. Too sweet, and too rich, are their usual objections. But if you try making it or if you have bought it from a reputable source, you’d be surprised at how different and elegant it can be. If you don’t mind me saying so, there’s even something incredibly sexy and seductive about baklava. I’ve seen perfumed syrup poured over hot trays of baked baklava; the resulting steam rising between the pieces of baklava causing them to ‘dance’. If these baklava had bellies, I could imagine them shimmying, draped in sparkling pistachio-coloured jewels; smiling, through honeyed lips.
This recipe comes from Belinda Jeffery, who credits it to her mom who loved cooking dishes from all around the world.
Pistachio and Walnut Baklava :
(from Mix & Bake by Belinda Jeffery)
200-250g unsalted butter
500g filo pastry
250g pistachios, finely chopped
250g roasted walnuts or pecans, finely chopped
110g castor sugar
1 teaspoon ground cinnamon
1/4 teaspoon ground nutmet
40 whole cloves (optional)
Honey Syrup :
330g castor sugar
250ml water
120g clear honey
1/2 cinnamon stick
finely chopped zest 1 lemon
2 tablespoons lemon juice
finely chopped pistachios (optional), for sprinkling
Gently melt the butter in a small saucepan over very low heat, then leave it to cool. Once it’s cool, use a spoon to skim off any white scum that floats on top, then carefully pour the clear golden liquid that remains into a jug.
Brush a 32 x 24 x 5cm baking tin with some of the butter. Cut the filo sheets in half widthways and trim them so they’re a similar size to the tin. Cover them with a damp tea towel to keep them pliable and stop them drying out.
In a bowl, thoroughly mix together the nuts, sugar, cinnamon and nutmeg. Line the base of the prepared tin with a third of the filo sheets, brushing each sheet very lightly with the melted butter as you go. You may have to slightly overlap the sheets if they don’t quite fit the tin, and make sure you press them into the corners and sides too. Sprinkle half the nut mixture evenly over the filo and shake the tin gently to even it out. Repeat the layering with another third of the filo and butter, then top with the remaining nut mixture. Layer the remaining filo over this, brushing it with butter as you go, then brush the top with butter too. If necessary, trim and discard any excess filo from around the sides of the tin with a sharp knife.
Put the tin in the fridge for about 20 minutes to firm up the baklava so it’s easier to score. When it’s firm, use a fine sharp knife to score the baklava, right through to the base, into diamonds of whatever size you want. Push a clove, if using, into the centre of each one.
Preheat your oven to 180’C. Bake for about 1 hour or until the top of the baklava is deep golden brown. Check it occasionally and cover it loosely with foil if it seems to be browning too quickly.
Meanwhile, for the syrup, combine the sugar, water, honey and cinnamon stick in a saucepan over high heat. Stir the mixture until the sugar dissolves, then stop stirring and bring it to the boil. Reduce the heat to very low and simmer the syrup, uncovered, for 20 minutes, skimming off any white foam that floats on the surface. Remove the syrup from the heat, discard the cinnamon stick and stir in the lemon zest and juice. Keep the syrup in a warm spot.
When the baklava is ready, remove it from the oven. Cool it on the wire rack for 1 minute, then slowly drizzle the warm syrup evenly over the top. Leave it to cool completely – the flavour is best if the baklava mellows for 12 hours or so before serving.
To serve the baklava, cut down through the score marks to loosen the diamonds, then ease them out. You can leave the cloves in (but remember to take them out before eating a piece because the cloves pack a powerful punch), or pull them out and sprinkle the tops with chopped pistachios, if liked.


