Daring Bakers Challenge : Pizza
I did a silly thing. I knew we were going to make pizza for the Daring Bakers Challenge this month, but didn’t read through the recipe until the last minute. So it was on the very last day of having time to spend in the kitchen, that I realised the recipe actually required a day’s worth of preparation and resting prior to baking!
*slaps forehead*
Still, I didn’t want to let such a minor detail deter me from attempting the challenge. So where it stated that the dough should rest overnight, I allowed it a good 4 or so hours sleep in the chiller before waking it up again. I figured, heck, if I often have to cope with that little sleep during my working week, then a pizza dough should be able to perform reasonably well too. Inbetween, I also made a basic tomato sauce for the pizza base.
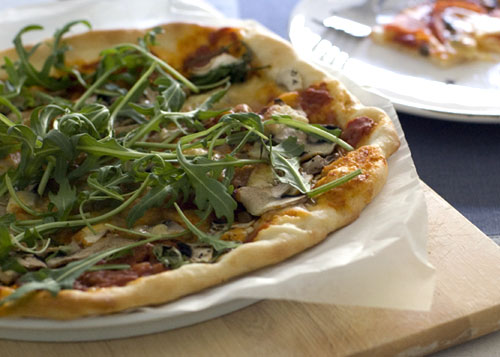
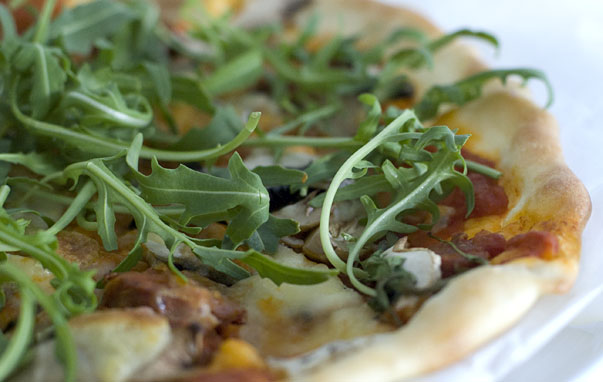
Turns out, the dough was every bit the survivor as I had hoped, and that evening, B and I sat down to a very satisfying dinner consisting of two different flavoured pizzas – a Margarita style pizza with tomatoes, bocconcini and basil, and a mushroom one. We even got into the spirit of things and watched an episode of The Sopranos.
In case you’re wondering about the tossing of the dough, I must confess I’ve never been much of a tosser (!) so, sorry, no photos there! Also, I’m sure a lot of fellow Daring Bakers opted to transform half their doughs into sweet versions, but I seem to have a mental block about dessert pizzas, and steered well away from that. The savoury versions were tasty enough, with plenty left over for another meal the next day, so I have no regrets about that decision! 😀
Thank you Rosa, for picking pizza as this month’s challenge, in memory of Sher. This recipe is now the pizza dough recipe to beat, in my kitchen! In fact, I’m hoping to make it again (the proper way) soon.

Basic Pizza Dough :
(makes 6 pizza crusts (about 9-12 inches/23-30 cm in diameter, from The Bread Baker’s Apprentice by Peter Reinhart).
607.5 g unbleached high-gluten bread flour or all purpose flour, chilled
1 3/4 tsp salt
1 teaspoon instant yeast
60g olive oil or vegetable oil
420g water, ice cold (4.5° C)
1 tablespoon sugar
Semolina/durum flour or cornmeal for dusting
DAY ONE
1. Mix together the flour, salt and instant yeast in a big bowl.
2. Add the oil, sugar and cold water and mix well in order to form a sticky ball of dough. On a clean surface, knead for about 5-7 minutes, until the dough is smooth and the ingredients are homogeneously distributed. If it is too wet, add a little flour (not too much, though) and if it is too dry add 1 or 2 teaspoons extra water.
3. Flour a work surface or counter. Line a jelly pan with baking paper. Lightly oil the paper.
4. With the help of a metal or plastic dough scraper, cut the dough into 6 equal pieces.
5. Sprinkle some flour over the dough. Make sure your hands are dry and then flour them. Gently round each piece into a ball.
6. Transfer the dough balls to the lined jelly pan and mist them generously with spray oil. Slip the pan into plastic bag or enclose in plastic food wrap.
7.Put the pan into the refrigerator and let the dough rest overnight or for up to thee days.
DAY TWO
8. On the day you plan to eat pizza, exactly 2 hours before you make it, remove the desired number of dough balls from the refrigerator. Dust the counter with flour and spray lightly with oil. Place the dough balls on a floured surface and sprinkle them with flour. Dust your hands with flour and delicately press the dough into disks about 1.3 cm thick and 12.7 cm in diameter. Sprinkle with flour and mist with oil. Loosely cover the dough rounds with plastic wrap and then allow to rest for 2 hours.
9. At least 45 minutes before making the pizza, place a baking stone on the lower third of the oven. Preheat the oven as hot as possible (260° C).
10. Generously sprinkle the back of a jelly pan with semolina/durum flour or cornmeal. Flour your hands. Take 1 piece of dough by lifting it with a pastry scraper. Lay the dough across your fists in a very delicate way and carefully stretch it by bouncing it in a circular motion on your hands, and by giving it a little stretch with each bounce. Once the dough has expanded outward, move to a full toss.
11. When the dough has the shape you want (23-30 cm in diameter – for a 180g piece of dough), place it on the back of the jelly pan, making sure there is enough semolina/durum flour or cornmeal to allow it to slide and not stick to the pan.
12. Lightly top it with sweet or savory toppings of your choice.
13. Slide the garnished pizza onto the stone in the oven or bake directly on the jelly pan. Close the door and bake for abour 5-8 minutes.
NOTE: After 2 minutes baking, take a peek. For an even baking, rotate 180°.
14. Take the pizza out of the oven and transfer it to a cutting board or your plate. In order to allow the cheese to set a little, wait 3-5 minutes before slicing or serving.
Tags: Daring Bakers, savoury


Big Boys Oven said,
October 30, 2008 @ 4:21 pm
this pizza looks fantastic, I love having fresh greens on top of the pizza!
arfi said,
October 30, 2008 @ 6:55 pm
i think everyone is amazed, so am i hehehe…
Holly said,
October 30, 2008 @ 10:24 pm
I’m glad to see that you got good results without resting the dough overnight. I was curious what would happen! Looks delicious!
Veggie Wedgie said,
October 31, 2008 @ 12:52 am
Your crust looks amazing! Are you sure you didn’t toss it?? 🙂
Hillary said,
October 31, 2008 @ 1:35 am
Nice pizza topping choices! I love margherita and mushroom. I’m glad it still worked out despite having less time! Good to know for future pizza bakers with less time 🙂
cakebrain said,
October 31, 2008 @ 6:46 am
the fresh arugula on top just does me in! Currently, it’s my favourite salad. What a delicious-looking pizza!
Shari said,
November 1, 2008 @ 2:05 am
Your Margarita pizza looks delicious and good to know the pizza dough can survive on less sleep!
clumbsycookie said,
November 2, 2008 @ 3:51 am
Glad it worked out still without the 2 days thing. It’s good to now that. That’s like pizza and salad in one! Cool!
venus said,
November 2, 2008 @ 9:11 am
I am not a tosser either and my dough landed on my counter instead of my hands!! Your pizza looks great even without letting it rest overnight! Bravo!
Lisa said,
November 3, 2008 @ 6:22 am
Stunning pizza pie, The arugula is a beautiful twist!