White Fig and Pecan Bread

whitefigs.jpg

My contribution for this week’s round of WHB, hosted by Anna of Anna’s Cool Finds isn’t a herb, but a rather unexpected type of dried flower.

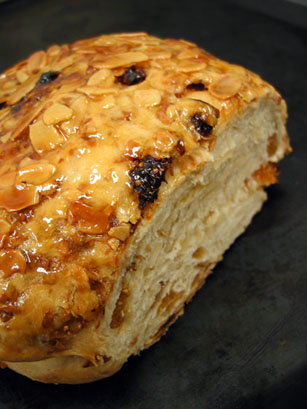
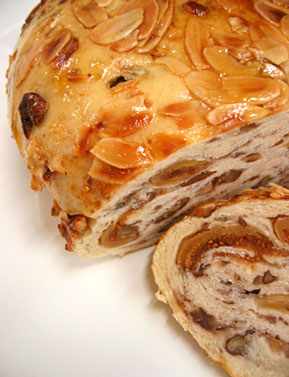
Surprised? Well, the picture above wouldn’t remind me of any sort of flower, and it is in actual fact, two dried white figs. Figs, often thought of as fruit, are botanically speaking, the fig tree’s flowers and seeds; something along the lines of an inverted flower, growing as a single mass. These false fruits are high in fibre and antioxidants, and also high in sugar. Fresh or dried, the figs I’m used to buying, are the darker coloured varieties, such as the Black Mission fig, so I was quite surprised to come across a packet of large dried white figs. The dried Iranian baby figs are the only other white fig I’ve tasted, and even then, those were very small (and cute!) and mild in flavour. I used the white figs in a dense crumbed, fruit and nut studded bread I made last week. The original recipe by Rose Levy Berenbaum is provided below. I’ve now made this several times, substituting the almonds with pecans, and using walnut oil instead of plain oil, the last time round. The pecans, which are darker in colour than the almonds, leave a lovely visible swirly pattern inside the bread. Thin slices of this bread are excellent with cheese. Rose recommends blue cheese, but I also like it with a crumbly cheddar.

New Zealand Almond and Fig Bread :

Dough Starter (Sponge)
117g bread flour
1/2 teaspoon instant yeast
3/4 teaspoon sugar
177g water at room temperature

1. In a mixer bowl, place the flour, yeast, sugar and water. Whisk until very smooth, to incorporate air, about 2 minutes. The sponge will be the consistency of a thick batter. Scrape down the sides of the bowl. Set it aside, covered with plastic wrap, while you make the flour mixture.

Flour Mixture
117g bread flour
72g whole wheat flour
1/2 teaspoon instant yeast
2 teaspoons oil
1 1/4 teaspoon salt
75g unblanched slivered almonds
75g dried Mission figs, stems removed, cut into 1/4- to 1/2- inch pieces.
(plus 1 whole fig for decor – I didn’t use this as fresh figs aren’t in season at the moment)

2. Whisk together the bread flour, whole wheat flour, and yeast. Sprinkle this on top of the sponge and cover it tightly with plastic wrap. Allow it to ferment for 1 to 4 hours at room temperature. (During this time the sponge will bubble through the flour mixture in places; this is fine)

3. Add the oil to the dough and mix with the dough hook on low speed until the flour is moistened enough to form a rough dough. Scrape down any bits of dough. Cover the bowl with plastic wrap and allow the dough to rest for 20 minutes.

Sprinkle on the salt and knead the dough on medium speed for 7 minutes. It will be smooth and shiny and cling slightly to your fingers. If it is not at all sticky, spray it with a little water and knead it in. (It will weigh about 490g). Allow the dough to rest for 10 minutes.

Turn the dough out onto a lightly floured counter and roll it into a rectangle about 9×14 inches. Sprinkle with the almonds and cut-up figs. Roll up the dough and knead it for a few minutes to incorporate the almonds and figs evenly. Shape it into a ball.

4. Set the dough into a bowl, lightly greased with cooking spray or oil. Press down the dough and lightly spray or oil the top. Cover the container with a lid or plastic wrap. Allow the dough to rise until doubled, about 1 1/2 hours.

Scrape the dough out onto a floured counter, and press down on it gently to form a rectangle. Fold the dough into a tight package or give it 2 business letter turns, and set it back in the container. Oil the surface again, cover. Allow the dough to rise until doubled, about 1 hour.

Almonds and Apricot Glaze
75g sliced almonds
50g apricot jelly
30g water

5. Turn the dough out onto a lightly floured counter and press down on it gently to flatten it slight. Round the dough into a 4 1/2 inch ball and lightly spray the surface with water. Scatter the almonds on a counter. Roll the ball of dough in the almonds to cover it completely, pressing the nuts into the dough. Firmly push the whole fig (if using), pointed end down, into the center so that it is submerged as deeply as possible into the dough. The loaf will measure 5 inches by 2 1/2 inches high.

Place it on a baking sheet. Cover with a large container. Let the dough rise until doubled, about 1 hour to 1 hour 15 minutes. It will be about 5 1/2 inches by 3 inches high, and when it is pressed gently with a fingertip, the depression will very slowly fill in.

6. Preheat the oven to 215’C 1 hour before baking. Have an oven shelf at the lowest level and place an oven stone or baking sheet on before preheating.

7. Gently set the baking sheet on the hot stone or baking sheet. Bake for 5 minutes. Lower the temperature to 185’C and continue baking for 35 to 40 minutes or until the bread is golden brown and a skewer inserted into the middle comes out clean.

8. Meanwhile in a small saucepan, mix the apricot jelly and water together. Bring to a boil and simmer for 1 to 2 minutes, stirring constantly. When the bread is done, remove it from the oven and brush it with the hot apricot glaze. Return it to the oven for 1 minute to set the glaze. Remove the bread from the oven and transfer it to a wire rack to cool completely.

whitefigalmondbread2.jpg whitefigalmondbread.jpg whitefigpecanbread.jpg

Comments (4)

I made this!

pc-coveredcake.jpg

Would it be fair to say, there aren’t too many things worth getting early out of bed for, on a cold Saturday morning? Well, I can name one now, and it’s currently sitting on my kitchen counter and I still feel the need to sneak a peek at it every so often, disbelieving that I managed to create it. People’s heads were turning when I walked down the street with it. Someone even stopped dead in her tracks and swivelled her head around like Linda Blair did in The Exorcist. I kid you not.

No, I haven’t suddenly acquired plastic surgery and now bear an uncanny resemblance to Giselle Bundchen. The extra plump smile on my lips isn’t even collagen, but chocolate ganache. I’ve just spent the most wonderful Saturday in Planet Cake’s workshop, learning how to make an ‘Exploding Star’ cake as part of their Basics 101 course.

Under the careful guidance of Handi Mulyana, the twelve of us managed to replicate what had been demonstrated to us in stages, whilst learning a few extra things in the process. For starters, mistakes can often be creatively hidden with the careful placing of an extra sugar star or positioning the cake in the right way. Also, these kinds of cakes are very hands-on. By the time the cake comes to the table as a slice on a platter, it has been handled (or groped) for at least a couple of hours (six, in our case), from the trimming and icing of the cake to the kneading, applying and smoothing of the fondant. Kind of off-putting, when you think about it. That’s not to say, you can’t now look at a cake and appreciate how much effort has gone into it’s creation.

If you have the time and an interest in crafts, I would definitely recommend you try one of Planet Cake’s classes. They are a little pricey, but worth every cent, in my opinion. Paris Cutler was on hand at all times, chatting to everyone present. She regaled us with stories about her cake experiences during our lunch break (they served a wonderful lunch of pasta and salads, and later in the afternoon, tea and a selection of friands) and her enthusiasm for all things cake related was like a bug that the rest of us at the table caught.

While I was in Balmain, where Planet Cake is located, I took the opportunity to visit the legendary bread and pastry store, Victoire and also popped into a patisserie that was new to me, Adriano Zumbo. The latter is a slender shop with displays of mouth-watering pastries and elaborate slices of cake behind glass. Locals queue politely upon entering the shop and most seem to already know what they want without having to peruse the selection. I leave with a long brioche and custard number, but a small part of me also wanted that equally long finger of a chocolate eclair and a handful of those sugar encrusted pastry snails. Maybe I’ll leave those for next time.

Meanwhile, I also have a loaf and tart from Victoire to contend with, and of course, that deeply chocolate Expoding Star cake that’s in the kitchen. Once the novelty wears off (hopefully in less than a week, which is how long the cake will last), I might finally be able to convince myself to cross that pristine fondant barrier and sink a knife into it.

Planet Cake
106 Beattie Street
Balmain 2041

Adriano Zumbo Patissier
296 Darling St
Balmain 2041

Victoire
285 Darling Street
Balmain 2041

pc-dryingstars.jpg pc-applyingganache.jpg

pc-coveredcake2.jpg pc-coveredcake3.jpg pc-cakeparade.jpg

Comments (6)

Macrina’s Raspberry Muffins

macrinaraspmuffin.jpg

I don’t usually buy raspberries from the shops. It seems like too much of a lottery to me. They can look like the biggest, most amazing raspberries in the world, and at $10-$12 a punnet, can still turn out flavourless or sour. Unless it’s for a special occasion; like when I’m making a special cake for a friend, I’d much rather be buying blueberries or even strawberries. When you do strike it lucky however, and manage to land a punnet of good raspberries, they are definitely worth the money and the trouble. I love these little orbed fruits. Self contained vessels of flavour that burst in your mouth. That intense red. Their fragility.

Being such striking fruits, I find we use them a lot at work, even during the winter. The climate in Australia is such that in the middle of winter you can be wearing woolen scarves in Sydney, but walking around in the shorts and a t-shirt, further up north of the country – I know I did, when we were on a family holiday near Townsville, several years ago. So that means a constant supply of berries all year round.

Raspberries (like most other berries) are great because they are high in fibre, packed with vitamins and minerals, and are rich in anti-oxidants. They also have the added bonus of being reportedly good for your eyesight – just think, with the combined power of raspberries and carrots, I will have.. X-Ray Vision!! (try telling that to your kids)

Raspberries don’t last long at their peak, so I try to use them up quickly once I’ve bought them. Any leftover or less-than-perfect fruit, often get turned into muffins as a mid morning snack. For added texture, I sometimes sprinkle some crumble mixture or demerara sugar over each muffin before baking them in the oven.

This raspberry muffin recipe is one of many I’ve been trialling over the past couple of months. It comes from the Macrina Bakery Cookbook, which is worth having a look at. These muffins are at their best eaten almost straight from the oven, and are my contribution to this week’s WHB, hosted by The Chocolate Lady.

Macrina’s Raspberry Muffins :

3 cups plain flour
3/4 cup caster sugar
3/4 cup light brown sugar
1 1/2 tablespoons baking powder
1 1/2 teaspoons salt
4 eggs
1 tablespoon pure vanilla extract
1 teaspoon freshly grated lemon zest
1 1/2 cups whole milk
8 tablespoons (113g) unsalted butter, melted and slightly cooled
2 cups whole raspberries
1/2 cup coarse raw sugar

Preheat oven to 190’C.

Sift flour, caster sugar, brown sugar, baking powder and salt into a medium bowl. Mix gently with a wooden spoon and set aside.

In a separate bowl, combine eggs, vanilla extract, lemon zest and milk, and mix with a whisk until combined. Add to the bowl of dry ingredients and stir with a wooden spoon just until all the dry ingredients are moistened. Slowly add melted butter and continue mixing until batter is smooth and there are no visible streaks of butter. Gently fold fruit into batter, taking care to avoid crushing the fruit.

Scoop batter into lined muffin tin, filling the cups to the top. Sprinkle coarse raw sugar on tops of muffins and bake on center rack of oven for 25 to 30 minutes. Finished muffins will be golden brown. Let cool at least 10 minutes before lifting each muffin from the pan.

Comments (23)

« Previous Page · Next Page »