Archive for May, 2008

Castagnaccio

Plainsboro Lunch Lady: [serving sloppy joe sandwiches at school lunchtime] They’re not really bad if you’ve never had really good ones.
–Rocket Science, 2007.

Remember Little Miss Sunshine? I watched it, not knowing too much about it, and was completely charmed by the movie and delighted by how unexpectedly good it was. I recently watched Rocket Science and had a similar feeling of happy discovery. Rocket Science is a bittersweet and very human comedy, and was made by Jeffrey Blitz, who also brought us Spellbound, that completely engrossing documentary about the 1999 National Spelling Bee held in Washington DC.

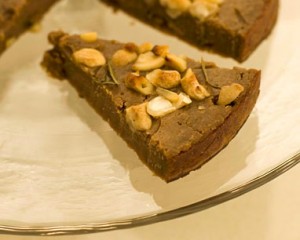
Happy discovery, is also my reaction to this Castagnaccio, a flat Italian chestnut flour cake which is a speciality of an Italian province, Lucchesia.

The first time I tried this cake was when Jaci and I attempted to bake one at work, several years ago. Never having tasted Castagnaccio before and not knowing what to expect, we found it really odd tasting, to the point of being unpalatable, and ended up throwing most of it in the bin (heart-breaking, when you know how much chestnut flour costs). We even considered writing to the cookbook author (it was either Stephanie Alexander or Maggie Beer; I can’t remember which) to query the logic behind the inclusion of the recipe in the book! In hindsight, I think our cake did not turn out well because the chestnut flour had soured. I didn’t know this then, but chestnut flour doesn’t keep very well. It should ideally be stored in the freezer and used within 6 months.

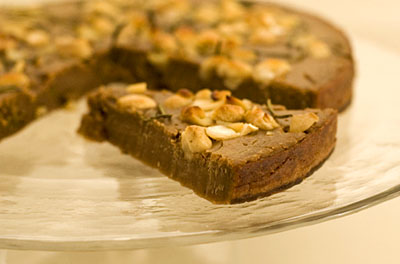
This time round, emboldened by a reliable cookbook by Anna del Conte and a bag of chestnut flour that would go to waste if I did not utilise it soon, I decided to reattempt the Castagnaccio. With great relief, the cake emerged triumphantly from the oven, brown like a roasted chestnut, and fragrant with rosemary. A wedge of this cake, eaten warm, not long after had been out of the oven, was very soothing, and the combination of rosemary and chestnut worked a treat. Having said that, I can imagine this cake would have it’s share of detractors as well. It has a pasty pudding-like texture that reminds me of some asian desserts/cakes I grew up eating. While I’m not a fan of most asian cakes, I quite like Castagnaccio.

Not only did I find it tasty, but now that I think about it, this cake isn’t actually all that bad for you either. It doesn’t contain any eggs, butter or gluten (ie. dairy-free and coeliac friendly!). It has the merest two tablespoons of sugar, which Anna del Conte added to her version of the recipe because she says a little sugar brings out the flavour of the chestnut flour which would not have as much depth of flavour unless you managed to source Tuscan chestnut flour. Omit the sugar, and you have a diabetic-friendly cake too.

Castagnaccio, topped with nuts and rosemary, is my contribution to this month’s Heart of the Matter, hosted by Michelle of The Accidental Scientist.

Castagnaccio :
(serves 6; recipe from Classic Food of Northern Italy, by Anna del Conte)

75g sultanas
300g chestnut flour
a pinch of salt
2 tablespoons caster sugar
3 tablespoons extra virgin olive oil
40g pine nuts [I didn’t have these at hand, so I used cashews instead]
1 tablespoon fresh rosemary needles

Soak the sultanas in warm water for 20 minutes, then drain them.

Heat the oven to 200’C.

Sift the chestnut flour into a bowl. Add the salt and sugar and about 400ml of cold water to make a smooth soft batter. Stir in 2 tablespoons of the oil and the sultanas.

Grease a metal tin with oil. The tin, which traditionally should be rectangular, must be large enough to allow the mixture to spread to a thickness of about 2cm. Pour in the chestnut batter and sprinkle the top with the pine nuts and rosemary needles. Drizzle the rest of the oil over and bake until the top is crisp and cracked and a lovely deep brown colour, about 25 to 40 minutes.

[I used a round cake tin which meant the batter was slightly less than 2 cm thick, and the baking time was reduced].

Comments (9)

SHF #43: Chilled (Lavender-scented) Oranges in Rum-Caramel Syrup

I came down with a bit of a cold a couple of days ago, so having something citrussy that was also rich in Vitamin C, was a good excuse as any to make a dessert!

This recipe for a simple way to glam up orange slices, is so easy that I’m almost embarrassed to be talking about it. The details come from Alice Medrich’s latest book, but I have also used a similar technique in the past to bathe oranges and whole peeled mandarins in caramel syrup, as a garnish for other desserts.

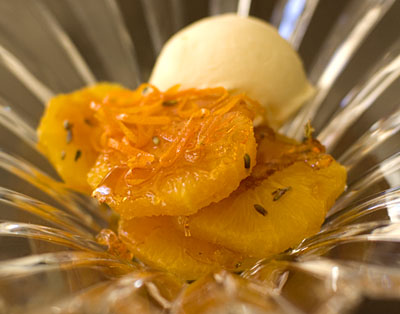
The simplest way to serve these orange slices once they are chilled, would be on their own, perhaps in a fancy glass. Or paired with a small scoop of ice-cream or a dollop of thick, luscious yogurt, if you want to take it a step further.

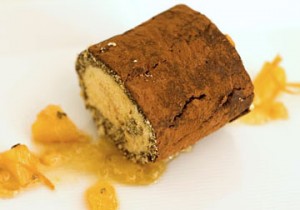
To venture into special-occasion territory, you can even use the chilled orange slices as a companion to a creamy, wobbly pannacotta or as a garnish for a dessert like the one pictured below. The juicy orange bits, flavoured with lavender buds, add a burst of flavour in the mouth, when paired with an orange cardamom ice-cream rolled in a thin cocoa-walnut sponge. The roll of sponge is, in turn, coated in cocoa powder and it’s sides covered with crunchy nougatine.

These refreshing, syruppy, perfumey, caramelly oranges are my contribution to SHF #43, hosted by Tartlette.

Chilled Oranges in Rum Caramel Syrup :
(serves 8; from Pure Desserts by Alice Medrich)

8 good eating oranges, preferably organic or unsprayed
1/4 to 1/2 cup dark rum
1 cup sugar
[I also added 2 teaspoons of lavender buds to the macerating orange slices]

Zest 2 of the oranges, using a zester or Microplane to make fine shreds. Set aside.

Use a sharp knife to remove the skin and all of the white membrane from all of the oranges. Cut the oranges crosswise into 1/4-inch thick slices. Remove any seeds. Arrange in a shallow serving dish, drizzel the rum over the oranges, and sprinkle with the zests. Set aside.

Make the caramel in a dry pan by heating gently until the sugar begins to melt into a clear syrup. Continue cooking the syrup evenly until it starts to darken. When this caramel is a reddish amber colour, or the colour of medium-dark honey, immediately pour it over the orange slices. The oranges may be prepared at this point and kept, covered, in the refrigerator, for up to 2 days. If you serve the oranges after a brief chilling, some of the caramel will have hardened into a thin brittle layer on top of the oranges, providing a pleasing crunch. Lengthier chilling will melt the caramel completely, bathing the oranges in sweet rummy caramel syrup without a crunchy layer. The choice is yours.

Comments (8)

The Good Biscuit : Nibby Whole Wheat Sables

Lucky me, Cakelaw has bestowed me with the Arte y Pico Award. If you must know, I can’t remember when the last time was that I won an award. Probably back in school, where they handed out encouragement awards like they were candy.

The rules behind this award are as follows:

1. Pick five blogs that you consider deserve this award for their creativity, design, interesting material, and also contribute to the blogging community, no matter what language.
2. Each award has to have the name of the author and also a link to his or her blog.
3. Each award winner has to show the award and put the name and the link to the blog that has given her or him the award.
4. Award-winner and the one who has given the award have to show the link of Arte y Pico blog, so everyone will know the origin of this award.
5. Award winner must show these rules.

In turn, I would like to pass this award on to the following blogs : Susan of Chocolatesuze, Kalyn of Kalyn’s Kitchen (truly one of the most tasty looking blogs out there), Eva of Sweet Sins, Aran of Cannelle et Vanille (I’m aware you already have this award, Aran, but you know how much I like your blog 🙂 ), and last but certainly not least, Lorraine of Not Quite Nigella.

Thanks for the great reads and eyecandy, guys. Have some biscuits while you’re here… 🙂

Nibby Whole Wheat Sables :
(makes about 48 x 2-inch cookies; from Pure Dessert by Alice Medrich)

127g plain flour
113g whole wheat flour
225g unsalted butter, softened
120g sugar
1/4 teaspoon salt
1 teaspoon pure vanilla extract
1/4 cup cacao nibs

Whisk the plain flour and whole wheat flours together. Set aside. In a medium bowl, with the back of a large spoon or with an electric mixer, beat the butter with the sugar, salt and vanilla for about 1 minute, until smooth and creamy but not fluffy. Mix in the cacao nibs, then add the flour and mix just until incorporated. Scrape the dough into a mass and, if necessary, knead it with your hands a few times, just until smooth.

Form the dough into a 12 x 2-inch log. Wrap and refrigerate for at least 2 hours, or, preferably, overnight.

Position the racks in the upper and lower thirds of the oven and preheat the oven to 176’C. Use a sharp knife to cut the cold dough log into 1/4-inch thick slices. Place the cookies at least 1 1/2 inches apart on trays lined with baking paper.

Bake until the cookies are light golden brown at the edges, 12 to 14 minutes, rotating the baking sheets from top to bottom and front to back halfway through the baking. Let the cookies firm up on the trays for about 1 minute, then transfer them to a rack and let cool completely.

The cookies are delicious fresh but are even better the next day. They can be stored in an airtight container for at least 1 month.

[Note: A good variation to the good biscuit, is to mix in 4 teaspoons (or more, depending on your preference) of Japanese green tea powder (matcha) into the butter mix instead of the cacao nibs, then proceed as normal. For presentation, press a few black sesame seeds into the top of each sliced biscuit before baking.]

Comments (4)

« Previous Page · Next Page »