Archive for November, 2007

Daring Bakers Challenge : Potato Bread

potatobread-loafnrolls.jpg

No secret here : I adore baking bread. I love kneading the dough, watching it rise, marvelling as it turns from a pale blob into a golden orb in the oven, and the aroma, oh the aroma!

So I was thrilled when Tanna of My Kitchen in Half Cups chose a Tender Potato Bread recipe as the Daring Bakers’ November Challenge.

What a challenge it was indeed. Being mindful of not adding too much flour during the kneading process, my dough ended up being very soft and moist and for the most part, quite hard to handle. When I started, this crazy Jabba the Hutt-like dough flowed from the bowl in which it was conceived, onto the floured bench top. I proceeded to massage it, and it continued to suck up copious amounts of flour, relentlessly. Ten minutes later, there seemed to be no end in sight, as it stuck to everything – my hands, clothes, bench, bits of equipment. Jabba’s revenge. At this point, I was starting to doubt that the end result would be in my favour. Potato bread I will not be eating today, I muttered, easing Jabba into a bowl to proof (which it did, copiously, up and over the sides : clean-up on aisle 3!).

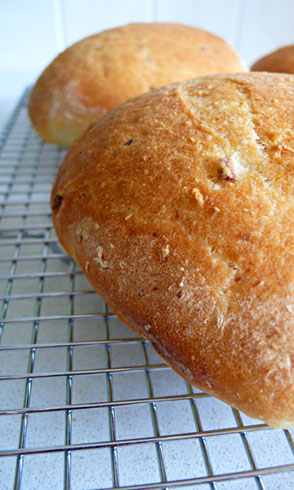
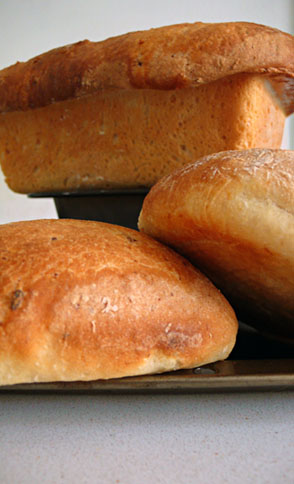
Luckily, my misgivings were unfounded. This bread is simply delightful. When baked, it has a crisp golden brown top with a soft, very flavoursome (very potatoey) interior. Just as Tanna had promised. Fresh from the hot oven, the rolls are tantalising. The next day, the loaf made for a great breakfast, when cut into doorstopper-sized slices. After toasting, they acquired a pleasing aroma and crispness that reminded me of the bread’s initial splendour when it was first pulled from the oven.

Tender Potato Bread :
(from Home Baking: The Artful Mix of Flour & Tradition Around the World by Jeffrey Alford and Naomi Duguid; adaptations by Tanna of My Kitchen in Half Cups)

4 medium to large floury (baking) potatoes, peeled and cut into chunks.
4 cups (950 ml) water, reserve cooking water
1 tablespoon plus 1 teaspoon salt
2 teaspoons active dry yeast
6 ½ cups to 8 ½ cups (1 kg to 1350g) unbleached all-purpose
1 tablespoon unsalted butter, softened
1 cup (130g) whole wheat flour

Making the Dough:

Put the potatoes and 4 cups water in a sauce pan and bring to boil. Add 1 teaspoon salt and cook, half covered, until the potatoes are very tender.

Drain the potatoes, save the potato water, mash the potatoes well.

Measure out 3 cups(750ml) of the reserved potato water. Add extra water if needed to make 3 cups. Place the water and mashed potatoes in the bowl you plan to mix the bread dough in. Let cool to lukewarm (70-80°F/21 – 29°C) – stir well before testing the temperature – it should feel barely warm to your hand. You should be able to submerge you hand in the mix and not be uncomfortable.

Add yeast to 2 cups all-purpose flour and whisk. Add yeast and flour to the cooled mashed potatoes & water and mix well. Allow to rest/sit 5 minutes.

Sprinkle in the remaining 1 tablespoon salt and the softened butter; mix well. Add the 1 cup whole wheat flour, stir briefly.

Add 2 cups of the unbleached all-purpose flour and stir until all the flour has been incorporated.

Turn the dough out onto a generously floured surface and knead for about 10 minutes, incorporating flour as needed to prevent sticking. The dough will be very sticky to begin with, but as it takes up more flour from the kneading surface, it will become easier to handle; use a dough scraper to keep your surface clean. The kneaded dough will still be very soft. Place the dough in a large clean bowl or your rising container of choice, cover with plastic wrap or lid, and let rise about 2 hours or until doubled in volume.

Turn the dough out onto a well-floured surface and knead gently several minutes. It will be moist and a little sticky.

Forming the Bread:

Divide the dough into 2 unequal pieces in a proportion of one-third and two-thirds (one will be twice as large as the other). Place the smaller piece to one side and cover loosely.

To shape the large loaf:
Butter a 9 x 5 x 2.5 inch loaf/bread pan. Flatten the larger piece of dough on the floured surface to an approximate 12 x 8 inch oval, then roll it up from a narrow end to form a loaf. Pinch the seam closed and gently place seam side down in the buttered pan. The dough should come about three-quarters of the way up the sides of the pan. Cover with plastic wrap and let rise for 35 to 45 minutes, until puffy and almost doubled in volume.

To make a small loaf with the remainder:
Butter an 8x4X2 inch bread pan. Shape and proof the loaf the same way as the large loaf.

Baking the bread:

Preheat the oven to 230’C. Dust risen loaves and rolls with a little all-purpose flour or lightly brush the tops with a little melted butter or olive oil (the butter will give a golden/browned crust). Slash loaves crosswise two or three times with a razor blade or very sharp knife. For the first 10 minutes of baking time, bake the loaves at 230’C, then turn the oven down to 190 °C for the remaining time. Bake the small loaf for a total of 40 minutes, and the large loaf for a total of 50 minutes. Then remove the loaves from the pans and return to the oven for another 5 to 10 minutes. The corners should be firm when pinched and the bread should sound hollow when tapped on the bottom.

potatobread-loaf.jpg potatobread-rolls.jpg potatobread-dough.jpg

Comments (28)

Disaster & the Double Chocolate Pecan Brownies

doublechocolatepecanbrownie3.jpg

When I first wrote about the ridiculous number of keys I owned for work, I never thought I would come across a case of actually feeling like I should be asking for more keys or even stronger locks.

On Thursday afternoon, someone discovered that my main freezer had suffered an attempt on it’s life. The unknown assailant had tried to open the freezer door by force and bent the lock in the process. This prevented it from closing fully, so when it was finally discovered, the internal temperature was hovering at 20’C and the thermostat was beeping in alarm. When I was told, I sprinted down the corridor to the freezer to be greeted by the sight of two kitchenhands and a chef, trying in vain to bend the lock back so that the door could be shut and the alarm would stop. I’ll never forget the sight of all those trays of melted ice-cream. Over 600 ice-cream sticks I had spent hours prepping, lying waste in multi-coloured pools like the drool of an alien monster; several tubs of back-up ice-cream and a few sheets of Danish pastry : all this equates to a large amount of food/money wasted. Not to mention if you work alone and each ice-cream stick represents precious time you spent standing in the chilly coolroom, scooping and skewering them. It was so distressing, my right eye actually started twitching involuntarily; a stress related trait I seem to have picked up from my mom.

The worst thing is that I work in an irritatingly super-security-conscious building, so, as my boss says, “It had to be an inside job!” I had made a point of locking the freezer this time because of its precious cargo. In the past I would open the unlocked freezer and occasionally discover that someone had filched a few ice-creams and had the gall to discard the used sticks on the floor of the freezer. If you’re going to steal, at least bin the sticks instead of leaving them there for me to discover and clean up!

It’s times like these that you don’t need a Mentos, so much as a big dose of chocolate. I baked this chocolate brownie last weekend when Calamari came over to rock it out with B. There’s still one piece left and it’s waving a very cheery hello to me at this very moment.

You can never have enough chocolate brownie recipes, I’ve decided. They’re a bit like shoes, or little black dresses, or even Qantas airplanes : “Subtly, each aircraft is different, so please pay attention to this safety announcement”.

Subtly, each chocolate brownie recipe is different, so please endeavour to try them all! Some yield incredibly moist and goey brownies, others are more cakey and firm. I like mine a little inbetween; almost chewy, and I always feel a little better and a bit more comforted after a small dose of chocolate. My personal preferences for brownies also include :

1. The darker the chocolate, the better.
2. No fresh fruit (not even raspberries) or dried fruit (like raisins, currants..).
3. Blondies are vastly inferior to brownies, but white chocolate chips folded into the brownie mix is OK, if you really must.
4. Toasted macadamia nuts are great, for a bit of texture and interest. Pecans and walnuts are also good, but given a choice, macadamias would come first.

I already have two favourite brownie recipes that I usually turn to, but sometimes it’s also fun (and therapeutic) to see what else the brownie world has to offer. This particular one, by my favourite domestic goddess, Belinda Jeffery, is unusual because unlike most recipes I’ve come across, the chocolate is not melted in a double boiler then mixed with the flour, eggs, etc. Instead, it is tipped into the food processor with sugar and processed until fine, then combined with the soft butter and eggs, and processed again.

The resulting brownie (which keeps very well) is rich and slightly chewy with a great crust. It soothes all ills and helps you carry on through the daily disasters of life…

Failing that, call the police and have the damn freezer door finger-printed.

Double chocolate pecan brownies :
(from Mix & Bake by Belinda Jeffery)

90g roasted pecans
1/4 cup (35g) plain flour or spelt flour
1/4 teaspoon baking powder
1/4 teaspoon salt
225g good-quality dark chocolate, cut into chunks
2/3 cup (150g) castor sugar
180g unsalted butter, at room temperature
2 x 60g eggs
3 teaspoons vanilla extract
120g good-quality milk chocolate, cut into small chunks
icing sugar, for dusting

Preheat your oven to 160’C. Butter a 22cm square cake tin. Line it with a sheet of buttered foil, then line the base with buttered baking paper. Set aside.

Pulse the pecans in a food processor to chop them coarsely. Tip them into a bowl and toss them with a couple of teaspoons of the flour. Set aside.

Whiz the remaining flour, baking powder and salt in the processor until they’re just combined, then tip them into another bowl. Add the dark chocolate and sugar to the processor and whiz them together until the chocolate is very finely chopped. Add the butter, eggs and vanilla extract to the chocolate mixture and whiz them together for 1 minute, stopping to scrape down the sides once or twice with a rubber spatula. Add the flour mixture and pulse it in only until everything just combines into a thick batter. Use a spatula to stir in the pecans and milk chocolate chunks. Smooth the batter into the prepared tin.

Bake for about 40 minutes or until a wooden toothpick inserted in the middle of the brownie comes out with moist, but not wet, crumbs on it. Cool the brownie in the tin on a wire rack. Once cool, pop it in the fridge to chill.

When you’re ready to cut it, grasp the foil and ease the whole brownie out of the tin. Invert it onto a flat plate and gently peel away the foil and paper, then invert it again onto a chopping board.

Slice the brownie into bars with a hot, dry knife. Just before serving the bars, dust with icing sugar to give them pretty snowy tops. Layer the remaining bars between sheets of baking paper in an airtight container. Store them in the fridge for 10 days or so (or freeze them for up to 4 weeks).

[Note: For the chocolate, I used a Belcolade 64% dark chocolate and Kennedy & Wilson milk chocolate which is lightly flavoured with cardamom. Also, I didn’t have the required cake tin, so used a round similar sized tin instead, with a removable bottom, which didn’t require lining with the buttered foil as stated in the recipe.]

kennedywilsonmilkchocolate.jpg doublechocolatepecanbrownie-bowl.jpg

Comments (8)

WHB #109: The victor of the stew

bayleaf-plant.jpg

When we first purchased our bay leaf plant from a favourite local nursery (now sadly defunct), the lady behind the counter warned that they were very slow growing plants and needed plenty of water. I’m not entirely sure why she felt fit to caution and almost deter us from trying to buy the plant – are there such things as instant gratification herbs? I was prepared in any case – my mom has a beautiful potted bay leaf in her garden, and I wanted one too!

Our scawny little plant did seem to take light years to inch it’s way up. For at least the first six months, I was convinced it was in some sort of hibernation and was so fragile and lacking in leaves that it could keel over at any moment. We’ve had it for more than a year now, and thankfully it’s grown to at least three times it’s original height – and thriving, despite the odds – including a recent dehydrative two and a half weeks while we were away on holiday and accidentally gave the wrong key to the friend who was going to do the watering.

The bay leaf or laurel plant, is a herb that’s definitely worth having growing in your backyard or on the balcony. Unlike some herbs like thyme that don’t lose too much in the translation when dried, the scent of a fresh bay leaf is vastly superior to it’s dried form. My first introduction to bay leaves were in cooking classes at Tafe. We scattered these ancient dried, discoloured and broken leaves into almost everything savoury we cooked – tomato sauces, bechamels, soups, stews, stocks – and I never understood what all the fuss was about. All I knew was that we used it rather robotically, under the watchful eye of the chef. Making a stock? Make sure you add a bouquet garni; a little bundle of flavourings including peppercorns, parsley stalks and the ever present dried bay leaf, all of which was sometimes held together by a strip of leek.

I finally laid my hands on a sprig of fresh (or at least fresher) leaves when I started working at a little cafe that prided itself on using quality ingredients. We had branches of the stuff hanging upside down in the shed out the back. The leaves were a beautiful dark green and when you bent a leaf in half and brought it up to your nose, the most amazing herbal smell greeted you. I love bay leaf in creme brulees and ice cream (bay leaf ice-cream is phenomenal with blueberries).

Out of habit, I also still occasionally use them in stews, like the Tomato, Chorizo and Chickpea Stew I cooked today for dinner. Because it’s a lazy weekend, there really is no need to be scrupulously following recipes or measuring quantities. Instead what you need to do is first peel yourself off the couch, meander into the kitchen and find a decent sized pot. My basic stew usually involves things I have readily around – onions, garlic, carrot are diced and sweated off in a pot, sometimes with some bacon, but in this case sliced chorizo, then a splash of verjuice or wine, a bay leaf or two and some tinned tomatoes (this time, organic). Bring to a boil, then simmer until reduced and slightly thickened. Season to taste and enjoy in the company of others.

Detractors may say that it’s getting a bit warm of weather to be having a hot and hearty dish. To them, I lazily raise my middle finger and help myself to another spoonful of this spicy, fragrant stew…. followed by a decent serve of ice-cream for dessert to cool down! 🙂

This week’s WHB is hosted by Vanessa from What Geeks Eat. If not to check out the roundup for herb inspired recipes, you should at least pop over to her site to gaze and a sigh at her Grilled Chocolate Sandwiches or even the Cream Cheese and Chocolate Cupcakes.

bayleaf-tomatochorizostew.jpg

Comments (4)